A Library Version Tale with Node.js: Set Exact Library Versions
Published on:
Last updated:
Something every developer should know: when you develop a project that has to go in production, it is good to control the version of the dependencies you use. Embed the libraries you use, or at least set fixed version numbers in your favorite dependency management tool.
It can help to avoid lots of bugs and headaches.
Here is one of the weirdest bug I had. I struggled a lot to find its cause, only to understand the bug was not in my code, but introduced by a third party dependency of which I lost control.
A New Feature
I work on some code actually deployed in production. I manage several environments (let’s restrain to production and preproduction) with automation tools so I can be sure the code is ready to go in production.
Needing an awesome network protocol library - let’s call it awesome-library -
I started one of my favorite npm command at the beginning of the project:
npm install awesome-library --saveThat was my mistake.
For those who use other tools or languages, this simply tells I want to add the
awesome-library as a dependency in my project; each time my automation tools
deploy the code, this dependency will be installed (--save option).
Later on, I needed to add a new feature in my project. I implemented the feature. Did some tests. Put it in preproduction. Seeing it was fine a whole day, it was deployed on the production environment the morrow.
2 hours later, the production platform was acting weird and I had network troubles.
Fortunately, I have the means to do a quick rollup, so the previous version was immediately restored.
Searching for the Bug
I had logs. Good practices for production. The code I added was so simple and minimal that I could not understand how it could have so drastically changed the behavior of the app. However the logs were showing some problems coming from the use of awesome-library and I actually did some modifications in some code using that library.
But why a behavior so different between my preproduction and production environments?

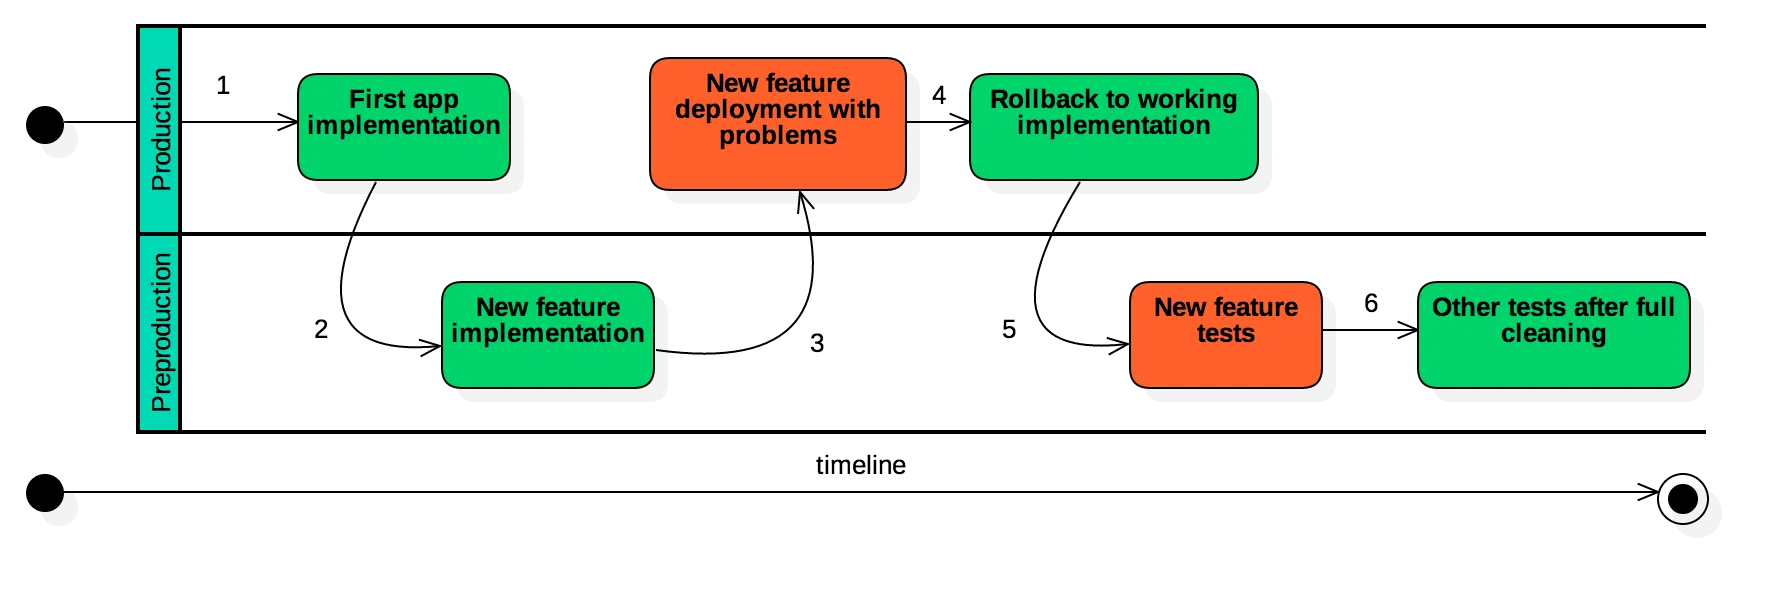
I immediately redeployed the code in one of my testing environments. Here is the very weird timeline of my tests.
- Original implementation in production, all is fine.
- New feature in preproduction, all is fine.
- Deployment in production: lots of instabilities
- Rollback: the app is not fully redeployed, actually a symlink is changed toward an already-installed version of the app.
- Full redeploy of my feature in the preproduction environment. Contrary to step 2, the feature was not working anymore!
- Quite randomly and after lots of tests mixing redeploys of the old version (that was not working any more in preproduction!) and of the new version in preproduction, my app started to work again in preproduction.
I finally had the intuition of checking the commit logs on GitHub of awesome-library. Good intuition. I discovered 2 things:
- my problem was detailed in the commit messages of the library on GitHub
- the library was updated 2 times while I was doing my production deployment and my tests
The Explanation
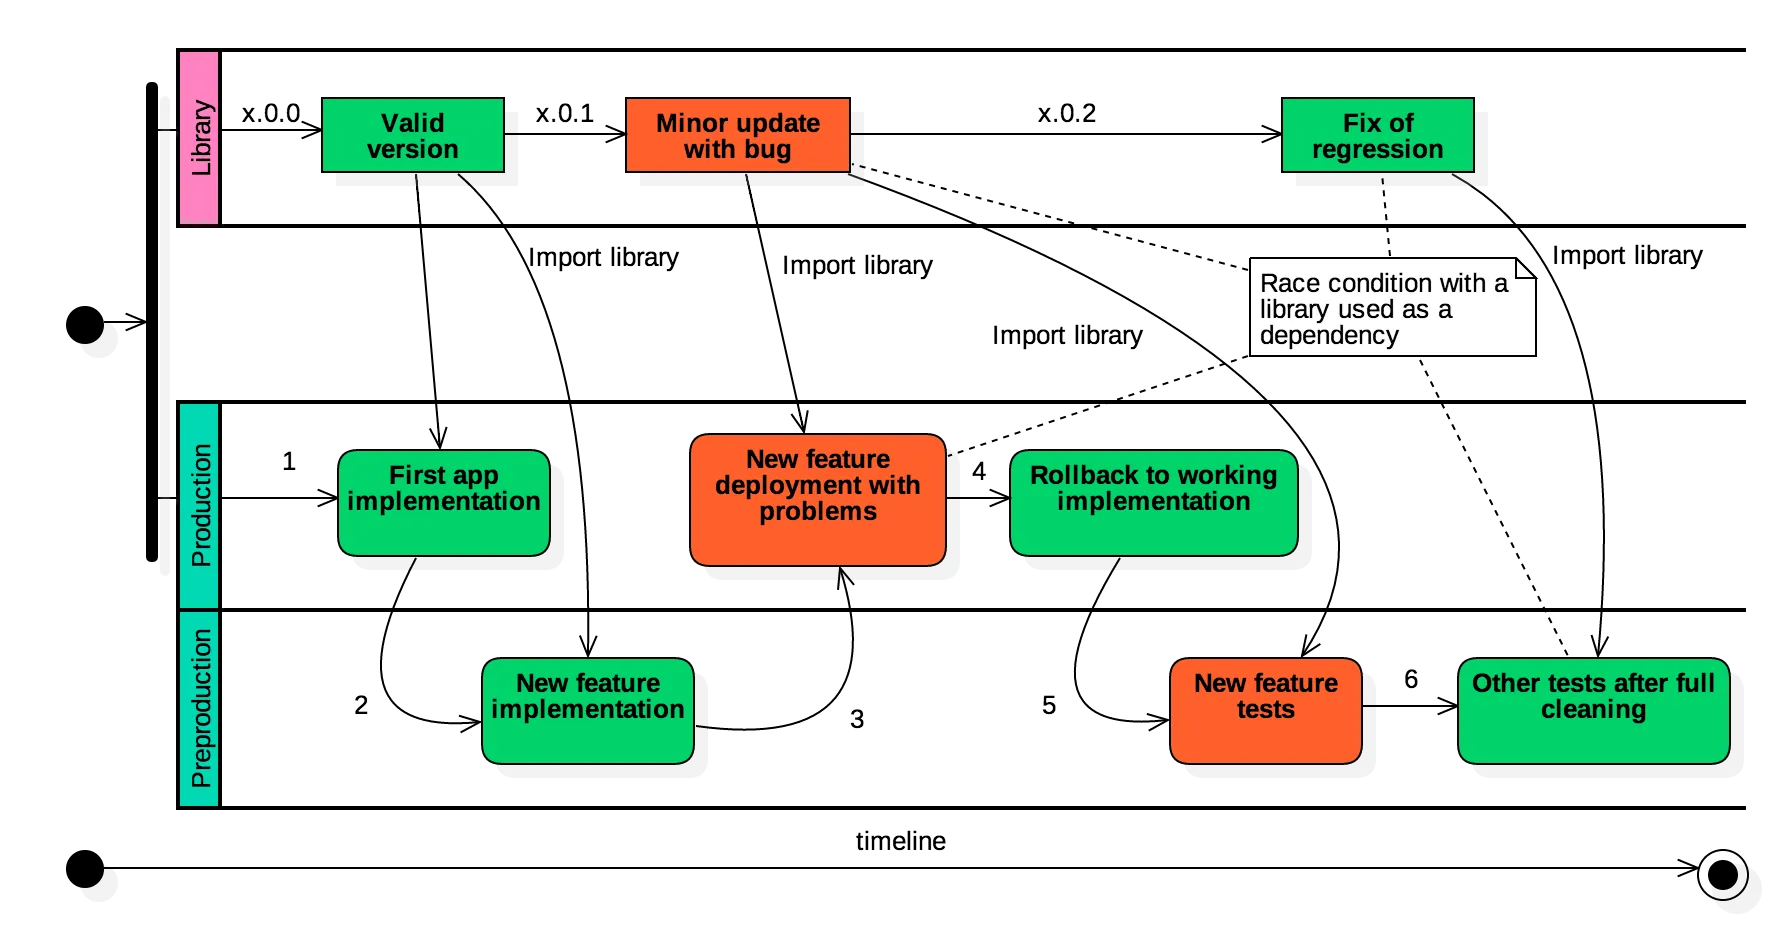
If we add the timeline of the awesome-library evolution, the full timeline view becomes:

When a fresh installation of my app is done, awesome-library is automatically pulled from GitHub.
My first implementation was using version x.0.0 of awesome-library. And all was fine. Unfortunately for me, just before I decided to put my new code in production, version x.0.1 of awesome-library was available - with a nasty bug in it - and my build system automatically fetched this new version!
While I was doing some tests on my code to find the bug, the maintainer of awesome-library corrected the regression and published version x.0.2. Since some of my tests (with the old AND new version of my app) were done with x.0.1 and some others with x.0.2 it was difficult to understand what was happening.
How can that happen? When a npm install --save is done, the
dependency is added in the file package.json using this notation:
"dependencies": { "awesome-library": "^1.0.0"}According to npm documentation, the carret ^ means
that higher minor or patch numbers are allowed. Each time you do a fresh install
with a fresh npm install command, npm downloads an updated version of the
library.
Allowing an automatic upgrade for the patch number in a SemVer-compatible library is not a good idea since a bug fix can also be a source of new bugs.
It can be noted that once npm install is executed, typing it once again does
not update the already installed library - unless npm update is executed.
Another Problem: Transitive Dependencies
Worse: awesome-library can also define dependencies.
We could try to avoid headaches by adding the --save-exact option to the npm
command:
npm install awesome-library --save --save-exactWhen this option is added, package.json becomes:
"dependencies": { "awesome-library": "1.0.0"}The caret disappears, and the library version is definitively set-up.
But what about the dependencies defined in the package.json of
awesome-library? And what about the dependencies of those dependencies? This
command does not freeze their version, they keep their ^, so control about
dependencies of dependencies is lost.
And the nightmare continue.
Conclusion
How this problem can be solved? There are generally 2 possibilities:
- all dependencies are distributed and committed with your project - in the
case of Node.JS it implies distributing the whole
node_modulesdirectory - … or we find a way to lock / freeze the version numbers of all the dependencies and their sub-dependencies
The second option is better, and actually some dependency tools for other programming languages do that by default.
With npm
npm provides a special command that can help:
npm shrinkwrapIt generates a npm-shrinkwrap.json file that contains the hierarchy of all
your dependencies and their version at the time you use the command.
The process is simple:
- dependencies are defined as usual in your
package.json - when you are done with your tests on your machine, perform a
npm shrinkwrapthat creates anpm-shrinkwrap.jsonfile - commit this file and distribute it along your project
- when someone else does a
npm install, the library versions described innpm-shrinkwrap.jsonare used - each time you add a dependency in
package.jsondo not forget to update the shrinkwrap file by doingnpm shrinkwrap
All the hierarchy of dependencies becomes known. A production environment must be as predictable as possible.
With yarn
yarn is a replacement for npm. I have little doubt it will
completely replace npm in the future since it features many interesting
improvement as compared with npm, while using the same library database than
npm.
yarn produces a yarn.lock file similar to npm-shrinkwrap.json which
details all the transitive dependencies. You must add your dependencies using
the yarn add command: it will automatically install them and will also update
the yarn.lock and package.json files.
This approch is better since you do not have to think about fixing your
dependencies: yarn will do that for you automatically.
Just do not forget that as for npm-shrinkwrap.json, yarn.lock is a file
that must be shared between developers, you must not ignore it in your source
version control system.